Wednesday, August 12, 2009
|
By Owner, Window Bonnets
We finally got the DVD converted for the web. It shows you in clear detail the ease of assemble, the art of "Tucknology" that is used in decorating--that's what makes it a NO SEW cornice, and how simple it is to hang.
The DVD is included with every sale so you can watch it on your big screen TV as well. I always get questions about doing the corners. You will not miss any detail of this technique. A variety of decorating techniques are included as well. Your conice can be as individual as you are.
We have worked hard to make this kit the best and easiest on the market. The professional-looking results will amaze and please you and your friends. And your investment is doubly safe, when you decide in a couple of years to change the rooms decor, just pop the cornice off the brackets, pull the "tucked" material from the grooves, cut new strips and "tuck" a totally new look into place. How wonderful is that!!!!!
Enjoy the watch, then go take a window measurement, place an order and just try that first window, you will come back for more. Click this link to place your order:
Cheers,
Jan
Wednesday, July 22, 2009
|
By Owner, Window Bonnets
 In order to make a cornice, you have to start with EITHER a bunch of wood, wood working tools, soft foam, staple gun, scissors, stud-finder (you know the ones hidden in your walls!), and fabric. --OR-- a Window Bonnets cornice kit, scissors, low temperature glue gun, small drill (for that 1 screw per bracket) and, of course, the fabric.Our kits make a full return cornice box over your window opening. Three simple steps and you are done. 1. Assemble, 2. Decorate, 3. Hang. Let me elaborate.
 1. Assemble--take the low temperature, full-size glue gun, squirt glue on the flat edge of one straight piece, go all around the edge and swizzle a bit in the fat center part, then rub the two pieces together and hold so the front side of the two pieces you are joining are even across the front. Continue to do this until the full straight of the cornice is built. If you need to cut the final piece, take serated knife, electric knife or small hacksaw. To seal the cut (so the popies do not get all over the house) place a piece of aluminum foil over the edge and iron it with a moderate heat iron. When you pull the foil off it is completely sealed like new. If your cut is not straight use this trick to "straighten" the edge! Lastly glue the end caps on straight and you are done with step 1.
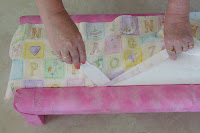 2. Decorate-- Now you are going to cut three strips from the fabric you have selected for the top, middle and bottom contours of the cornice. They can be all the same material, see some samples at http://www.windowbonnets.com/html/living_rooms.html, or use different fabric for the top/bottom and middle contours. This is your creative choice. Hint--the inexpensive material looks just at good as the expensive stuff! The instructions in the kit 9", 12" or 15" kit tells you how wide to cut the strips for each contour and as to the length, add 25" to the straight measurement so you have enough to go over and around the endcaps. Now the really simple part.... just tuck the fabric strip into the grooves cut in the cornice form! It is very easy and fun. If your cornice will be seen from the back, feel free to cover the back using the grooves at the top and bottom contours. Once done you are ready to hang.
 3. Hang-- The brackets are all included in the kit with screws and screw sleeves. Two brackets come with each 48" kit and each extension of 32" includes another bracket. You only need to mount a bracket every 3'-4'. You do not need to find the stud in the wall. Using a small 1/8" drill bit, put a hole in the wall at the appropriate height. If you only hit drywall hammer in the screw sleeve and screw in the bracket. Although our video shows using two screws per bracket, it is really only necessary to use one. Once the brackets are up and level, hold the cornice up and position the bracket at the top tuck groove and push it onto the bracket.You are done! Step back and I guarantee, a "WOW" will be next. I have made many of these cornices for people but I have talked with many of my first time "cornice makers" and they report that it takes approximately 4 hours to complete a 9 foot cornice! That's not much time compared to making a wood cornice. For more pictorial instruction, see this page on our site: http://www.windowbonnets.com/html/window_treatments_instruction.html. No excuses now, measure those windows and get a kit. Try it, you will want to do more! Happy creating!!


